Introduction
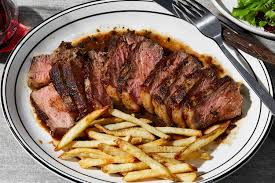
BEST Reverse Sear Steak Recipe. When it comes to steak, most people think you need a screaming hot pan or grill to get that perfect crust. But what if we told you that the secret to a tender, evenly cooked steak that’s juicy inside and seared to perfection outside… actually starts with low and slow cooking?
Enter the Reverse Sear Method – the technique used by top chefs and serious home cooks to get restaurant-quality steak every time. Whether you’re cooking a ribeye, New York strip, or tenderloin, reverse searing is the most foolproof way to cook thick steaks, especially for beginners who don’t want to mess it up.
What is Reverse Sear?
Reverse searing is the opposite of the traditional method. Instead of searing the steak first and finishing in the oven, you slowly roast the steak in the oven first, then give it a final quick sear in a hot pan. This method allows:
- Even cooking from edge to center
- More control over doneness
- Less risk of overcooking
- A perfect golden-brown crust at the end
Why This Method Works
The reverse sear works by cooking the meat gently to the exact internal temperature you want, and then finishing it off with a high-heat sear for color, crust, and flavor. It eliminates the guesswork and gives you:
- A juicy interior with no grey band
- A deep, flavorful sear from the Maillard reaction
- Time to prepare sides while the steak roasts
This is the perfect technique for people who want consistency and flavor, without needing a sous-vide machine.
Best Cuts for Reverse Sear
Reverse searing works best with thick-cut steaks—at least 1 inch thick (preferably 1.5 to 2 inches). Here are some great choices:
- Ribeye
- New York Strip
- T-Bone or Porterhouse
- Filet Mignon (Tenderloin)
- Tomahawk Steak
💡 Avoid thin steaks like sirloin or skirt steak with this method. They’ll overcook before you get a good sear.
Ingredients
Here’s what you need to cook the perfect reverse sear steak:
- 2 thick-cut steaks (ribeye, striploin, or filet mignon)
- 2 teaspoons kosher salt
- 1 teaspoon freshly ground black pepper
- 1 tablespoon neutral oil (canola, grapeseed, or avocado oil)
- 2 tablespoons butter (optional, for basting)
- 2 garlic cloves, smashed (optional)
- Fresh rosemary or thyme (optional, for extra flavor)
Tools You’ll Need
- Oven (or grill with lid for indirect cooking)
- Cast iron skillet or heavy-bottomed pan
- Meat thermometer (digital is best)
- Wire rack and baking tray
- Tongs
- Paper towels
Step-by-Step Instructions
1. Prep the Steak
Start by patting your steaks dry with paper towels. Moisture on the surface can steam the meat instead of searing it. Dry steaks = better crust.
Generously season both sides with salt and pepper. You can do this right before cooking, or up to 24 hours ahead for dry-brining (store uncovered in the fridge for deeper flavor and better crust).
Let the steak come to room temperature for 30–60 minutes. This helps it cook evenly.
2. Low and Slow Roast
Preheat your oven to 250°F (120°C). Place a wire rack on a baking sheet and lay the steak on top. The wire rack allows air to circulate for even cooking.
Insert a meat thermometer into the thickest part of the steak. Roast until it reaches your desired internal temperature:
| Doneness | Internal Temp (Before Searing) |
|---|---|
| Rare | 115°F (46°C) |
| Medium-Rare | 125°F (52°C) |
| Medium | 135°F (57°C) |
This usually takes 30 to 45 minutes, depending on thickness.
3. Rest the Steak
Once your steak reaches the target temperature, remove it from the oven. Let it rest uncovered for 5–10 minutes. This pause allows juices to redistribute and gives you time to heat your pan for the sear.
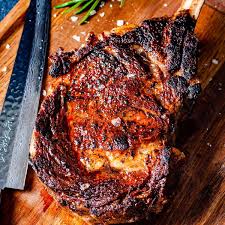
4. Sear in a Hot Pan
Heat your cast iron skillet over high heat until smoking hot. Add the 1 tablespoon of oil and wait a few seconds.
Place your steak in the pan. Sear each side for 45 to 60 seconds, pressing gently for full contact.
Optional but recommended: During the last 30 seconds of searing, add butter, garlic, and herbs to the pan. Tilt the pan and use a spoon to baste the melted butter over the steak.
This adds richness and an aromatic finish.

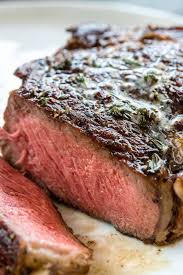
5. Final Rest and Slice
Remove the steak from the pan and rest it for another 3–5 minutes before slicing.
Slice against the grain for maximum tenderness. Serve with your favorite sides and enjoy that perfect edge-to-edge doneness with a crispy crust!
Reverse Sear Steak Recipe
Ingredients
Method
- Take the steaks out of the fridge at least 30–60 minutes before cooking to bring them to room temperature. This ensures even cooking.
- Pat them dry with paper towels. This helps create a better crust later.
- Season generously with salt and pepper on all sides. You can do this just before cooking or dry-brine them in the fridge for up to 24 hours (uncovered for a crispier crust).
- Preheat your oven to 250°F (120°C).
- Place a wire rack on a baking sheet and lay the steaks on top. The rack allows hot air to circulate for even doneness.
- Insert a meat thermometer into the center of the thickest part of one steak.
- Bake in the oven until the steak reaches your desired internal temperature:
- Rare: 115°F (46°C)
- Medium-Rare: 125°F (52°C)
- Medium: 135°F (57°C)
- This usually takes 30–45 minutes, depending on the thickness of the steak.
- Remove the steak from the oven.
- Let it rest for 5–10 minutes on the rack or a cutting board while you preheat your pan.
- This step helps the juices redistribute and prevents them from running out when sliced.
- Heat a cast iron skillet or heavy pan over high heat until it’s smoking hot.
- Add 1 tablespoon of oil and swirl to coat the pan.
- Carefully lay the steak in the pan. Sear for 45–60 seconds per side until a deep brown crust forms.
- For added flavor: Add 2 tablespoons of butter, 2 crushed garlic cloves, and a sprig of rosemary or thyme during the last minute of searing.
- Tilt the pan and baste the steak with the melted butter using a spoon.
- Transfer the steak to a clean cutting board.
- Let it rest for another 3–5 minutes to finish cooking and lock in the juices.
- Slice against the grain and serve with your favorite side dishes like mashed potatoes, sautéed veggies, or rice.
Tips for the Best Reverse Sear Steak
- Use a meat thermometer – this is the secret to perfect doneness.
- Season generously – thick steaks need more salt and pepper.
- Use high-smoke point oil – like avocado or canola to avoid burning.
- Sear in a dry pan – don’t overcrowd or use too much oil.
- Don’t skip the final rest – this helps retain all those delicious juices.
Ideal Side Dishes
- Mashed potatoes with garlic butter
- Creamed spinach or sautéed mushrooms
- Roasted garlic rice
- Grilled vegetables
- Caesar salad or mixed greens
- Baked mac and cheese
Reverse sear steak pairs well with anything comforting and savory. It’s also a star for date nights, celebrations, or weekend dinners.
Frequently Asked Questions
❓ Can I reverse sear on the grill?
Yes! Use indirect heat (one side of grill off, the other on). Roast the steak on the cool side, then sear over direct flame.
❓ What if I don’t have a thermometer?
You can go by time (around 40 minutes for 1.5-inch steak), but a thermometer ensures perfection. They’re inexpensive and worth it!
❓ Can I do this with frozen steak?
You’ll need to fully thaw it first. Cook from frozen will not yield the same even results with this method.
❓ Is reverse sear better than pan-searing?
For thick steaks, yes! Reverse sear gives even doneness and more control. For thin steaks, pan-searing is better.
Nutritional Info (per serving, estimated)
| Nutrient | Amount |
|---|---|
| Calories | 530 kcal |
| Protein | 45 g |
| Fat | 38 g |
| Saturated Fat | 14 g |
| Carbohydrates | 0 g |
| Fiber | 0 g |
| Sodium | 800 mg |
| Cholesterol | 135 mg |
Nutrition values will vary depending on the cut of steak and size.
Final Thoughts
If you’ve ever struggled with steaks that were burnt outside and raw in the middle, the reverse sear method will change your kitchen forever. It’s an easy, reliable, and impressive way to get that perfect pink center and golden crust every single time.
Whether you’re cooking for guests or just treating yourself to a steak night at home, reverse searing gives you full control, excellent flavor, and zero stress.
Related Recipes to Try
Love the idea of making delicious meals from canned sardines? Here are a few more dishes that are affordable, comforting, and easy to make: